So, you are working on some updates on your app, and you find out that one feature you need requires webpack 5, but you still have not updated it. Or you are just starting a new app, and wonder, why webpack 5?
Webpack 5 offers improved compilation performance with persistent caching and other improvements. Playing with webpack configuration is a tricky task and that is why we’re offering this small guide.
You can find a short step-by-step guide here on how to update, explaining everything along the way.
We will be focusing on upgrading CxJS projects specifically but for all intents and purposes, you can use this as a guideline for any JavaScript project based on webpack. Step by step, we will go through:
First, let’s check that you are actually on an old version of webpack. For this, you can use your package manager of choice (e.g. npm, yarn) and ‘list’ the version and the package that you are interested in.
npm list webpack yarn list webpack
This will give you the basic information about the package, and the version number. If this says 5.0 or higher, you are good to go. Otherwise, you will need to update, with the following:
yarn add webpack npm install webpack
After the installation is done, you can check the version with the ‘list’. With that, the first step is done.
Plugins are an essential part of the webpack, as they provide important improvements as well as some creature comforts. You will most likely use at least one plugin, if not many on almost every single one of your projects.
You can check the whole list of available plugins here.
When you update the webpack, you might need to update a few additional plugins. Some will work out-of-the-box, but others you will have to update for them to work properly.
An example of one of those is the html-webpack-plugin. In our project, we had a 4.3.0 version, but now we need to update it. The process is the same as for the webpack update, with a different package name.
yarn add html-webpack-plugin npm install html-webpack-plugin
Another plugin that needs updating is the postcss-loader (if you are using it). You might need to update a few more loaders, like css-loader and sass-loader, depending on the version. You also might need to update more plugins (mostly loaders, like sass-loader), depending on what you are using in your project, but the process is the same.
Once you have updated the webpack package, you will need to update the configuration, because there are slight differences between the two versions. Our webpack configuration is split between 3 different files, the first of which is common settings, the second being the development configuration, and finally the production configuration.
Three-file webpack configuration is common for our CxJS apps. We have separated the production from the development configuration but extracted common settings in a separate file. This is so we don't have code repetition, which makes maintaining code easier.

We will need to update all of them to the latest spec.
Let’s start!
In the webpack.config.js file, you will need to change the following:
In the rules section, you will have to change the loader for each rule, from ‘loader’ to ‘use’ key, where you can then specify the loader and the options if you have them. For example, we will change the Babel rule, with a dedicated configuration file.
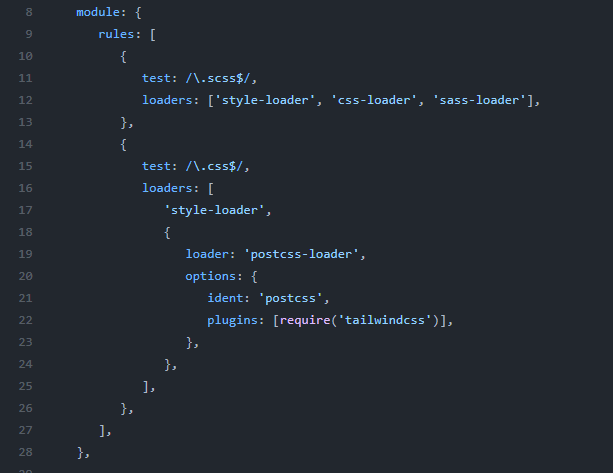
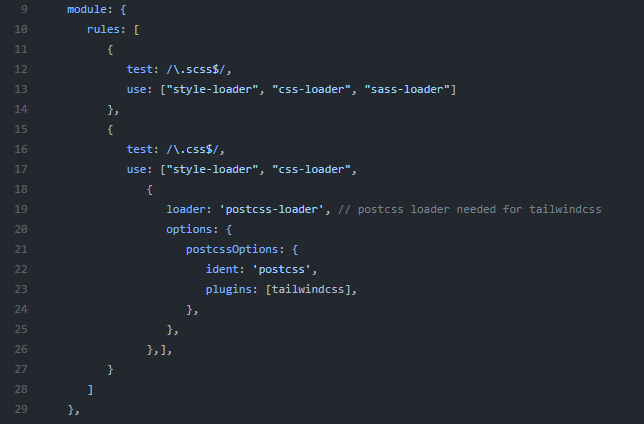
And that’s it. You are done with the general configuration file. Do the same for development and production file as well.
*If you are using tailwindcss, you need to specify the SCSS / CSS loader as the ‘postcss-loader’, with the tailwind as a plugin. This will ensure that the tailwind is properly loaded. More on this will be covered in the next post.
*If you get an error trying to start the project, regarding the postcss-loader, you might not have the package installed. So, just add it:
yarn add postcss-loader npm install postcss-loader
Caching is a very useful feature of webpack which makes build times faster. Instead of building the whole app over and over again, only the changed parts will be built, while reusing the unchanged ones from the cache (temporary storage).
And when something changes in the global configuration, the webpack needs to invalidate the whole cache.
While this works great for directly project-related files, such as html, CSS / SCSS files, images etc, there is a problem with reloading packages, when you, for example, upgrade a plugin or change a configuration file.
Webpack just cannot handle all of that out-of-the-box.
For that reason, there is a new option for caching, called ‘buildDependencies’, which allows you to specify code dependencies of the build process.
This means, whenever there is a change in the files that you have specified, which are critical for the build, webpack will invalidate the cache.
Why is this not enabled straight away, I can hear you asking. Well, the thing with the cache is, it works 95% of the time as it should, but there is a small chance that this might break your application building or workflow.
If something is cached that shouldn’t be, that might lead to problems down the road. That’s why you need to configure it correctly. And webpack prefers stability and safety over performance, hence they disable this feature by default.
But if you configure persistent caching correctly, there should be no problems.
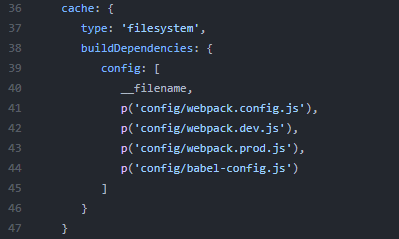
Type ‘filesystem’ enables the filesystem cache, and puts the in-memory cache in second place. This enables the persistent cache.
The program will still look for the in-memory cache first, but it will fall back to the filesystem. In ‘config’ add files that will invalidate the cache if they are changed (you should put your configuration files here).
If your app needs to work on IE 11, you will have to add a target key in your webpack configuration file, like so:
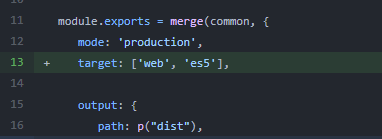
By default, webpack’s runtime code uses ES2015 syntax to build smaller bundles. If your build targets environments that don’t support this syntax (like IE11), you’ll need to set target: ['web', 'es5'] to revert to ES5 syntax. You can find out more about this here.
It takes around 10 minutes to finish the update process. This will bring all the benefits that webpack 5 brings to the table, such as improved performance by leveraging persistent caching and long-term caching, improved algorithm defaults, improved bundle sizes using better Tree Shaking, Code generation and much more.
Now there is no excuse to run an old webpack in your project!
Happy coding!